Approx. and descent
Contrafuerte de la Zanzi: 'Somos Ricos'
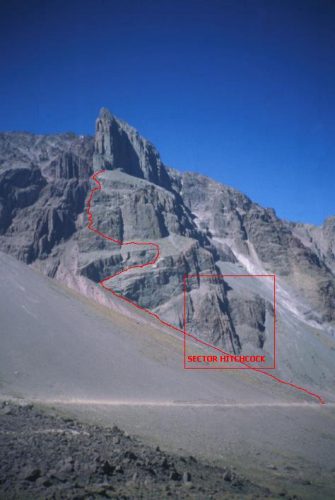
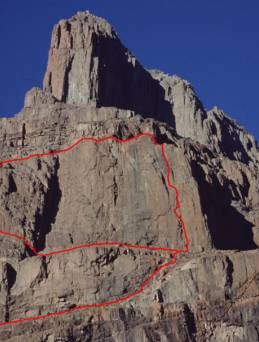
There a several faces. The access to the uppermost is most difficult to find and pretty dangerous. See also preceeding page. Accesses as drawn in both pictures are not identical. Be careful as several people lost their lives already!
|
Approx. and descent |
|
Topos:
 |
 |
 |
 |
| Zanzi, Topo 1 | Zanzi, Topo 2, (No. 4 is Ira de Thor): | Topo of Directisima (by I.B. Andueza) |
Somos Ricos detalles... |
 |
 |
||
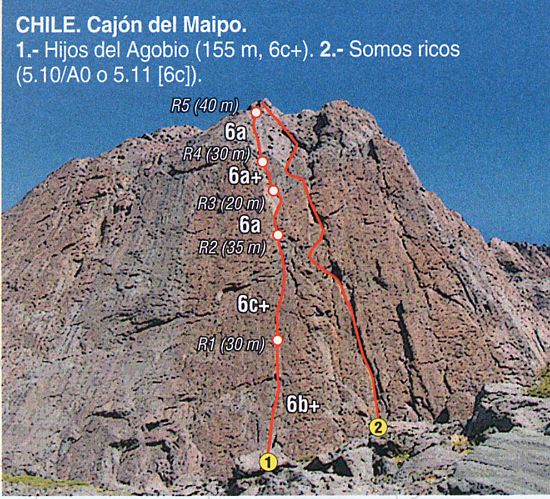
| Hijos del Agobio, 150m 6c+ | Integral a la Zanzi "Como Pedro por su casa" |
And finally a discription of Concierto para Bongs:
CONCIERTO PARA BONGS (V 5.10+/6a+, 250 mt.)
Concert for Bongs is the classic normal route of the NW face of Punta Zanzi. It was first ascended by Dagoberto Delgado and his colleagues. In its rather vertical 7 pitches, and in part due to its committed approach, it's a very good beginning for those looking to get more seriously involved in wall climbing.
This is a brief description of the route, with some practical tips to repeat it in a day.
GEAR: A set of cams of all sizes, a set of stoppers, two 50 mt. ropes and a helmet.
APPROACH: (2-3 hours) The trail climbs up an evident scree starting at the side of the road from Lo Valdes to Termas de Colina, to the left bottom end of the Hitchcock Crag. It goes on zigzagging by the terraces surrounding the huge lower cliff of the wall. At some exposed spots it may be advisable to set up a belay, especially for newcomers. Once you reach the bivy at the base of the wall, walk to the left and climb an easy 50 mt. face (IV-V) to a bolted belay station, and walk therefrom towards the very beginning of Directisima, an evident crack that splits the wall from bottom to top. Climb a short crack (roped if necessary) to a small ledge, and walk around the N face to the right, to a parallel cracks system at the start of P1.
P1: Climb the parallel cracks, which lead to R1 in 15 mt.
P2: Downclimb to the right to get to the base of a perfect crack dihedral, and scale up for some 25 mt. until the end of the left face, to R2 on a small ledge.
P3: Go on by the crack system to R3 on the left (35 mts.). You can rappel down from here straight to R1 with two 60 mt. ropes.
P4: Go right and around the terrace to climb an awesome hand crack dihedral for 35 mt., to a ledge with a bolted belay station (R4). The rappel line connects with the route at this point.
R5: A long 50 mt. traverse climbing and downclimbing to the right, to set up R5 at the base of chimney not too hard at first sight.
R6: Climb for a full rope length by the chimney and faces to set up R6.
L7: Continue climbing by any of the crack systems to the terrace atop. From here, hike up some 30 minutes to the summit.
DESCENT: There are rappel stations from the terrace down, which connect with the route in R4. Walk to the left of the terrace and look for the bolts. From the base of the wall to the car, consider at least 2 hours. You can walk and downclimb all the way down, but it may be advisable to rappel the most exposed spots.